Chapter 1: Introducing Python Core Concepts
Network engineers require to connect to network devices, collect data using network OS commands and parse through the data to discover the required information. With that in mind, Python’s core concepts such as data types, operations, data structures, control flow statements and modules are discussed in this chapter. Before discussing the core concepts, Python implementation on various operating systems need to be discussed.
Python Implementation on Various Operating Systems
Python implementation on Microsoft Windows, Apple Mac’s OS X, Ubuntu Linux distribution and Arista Extensible Operation System (EOS) is discussed in this section. There are two tracks of Python versions available today 2.x and 3.x. Python version 2.x is widely deployed and the industry will eventually move to 3.x. Python programs in this book are written using the version 2.7.x.
Microsoft Windows
Python is not installed by default on Microsoft Windows operating systems. You can download and install python from www.python.org website. For this book, It is recommended to download and install Python version 2.7.x. By default, Python will be installed in the c:Python27 folder. After installing Python, PATH variable needs to be updated with the path to the Python installation folder.
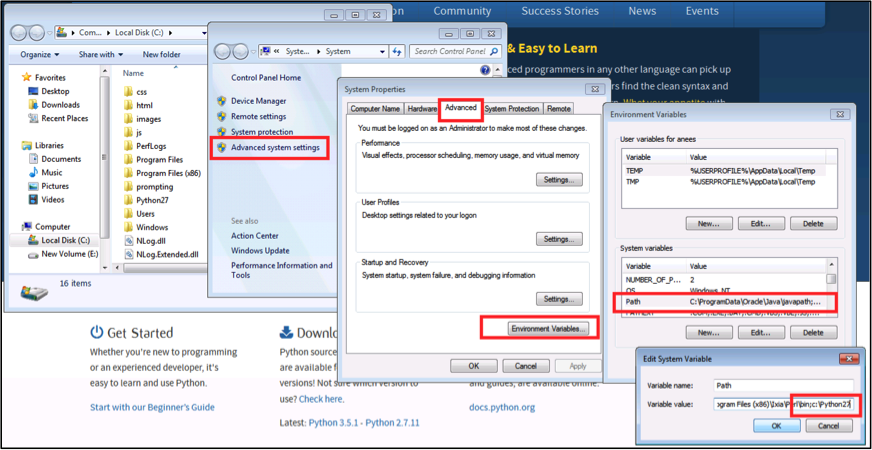
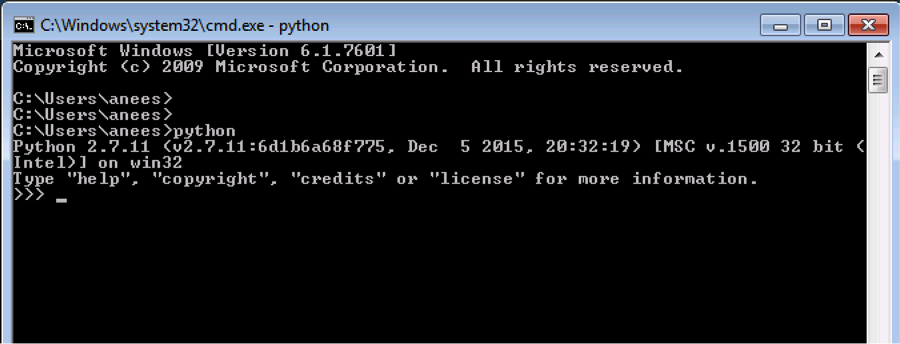
After changing the PATH variable, launch the Windows command prompt and verify you can invoke the Python interpreter.
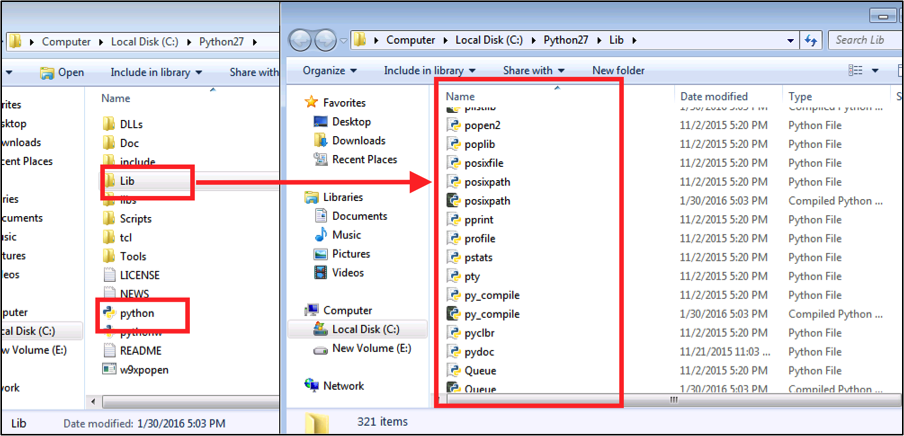
Python interpreter is located in the folder C:Python27. Python standard library modules are located in C:Python27folder.
Apple Mac OS X
Apple Mac OS X comes with Python 2.7.x. You can verify by invoking the interpreter from the terminal. If your OS X version does not have Python installed by default, you can download and install python from www.python.org website.
anees:~ anees$ python
Python 2.7.10 (default, Aug 22 2015, 20:33:39)
[GCC 4.2.1 Compatible Apple LLVM 7.0.0 (clang-700.0.59.1)] on darwin
Type "help", "copyright", "credits" or "license" for more information.

Python interpreter is located in /usr/bin folder and Python standard library files are located in /usr/lib/python2.7 folder.

::

anees:~ anees$ which python
/usr/bin/python
anees:~ anees$ ls -l /usr/lib/python2.7
lrwxr-xr-x  1 root  wheel  75 Sep 17 05:27 /usr/lib/python2.7 -> ../../System/Library/Frameworks/Python.framework/Versions/2.7/lib/python2.7

anees:~ anees$ ls -l /usr/lib/python2.7/

****** Skipped ******
-rw-r--r--     1 root  wheel    8252 Aug 22 20:37 posixfile.pyo
-rw-r--r--     1 root  wheel   13925 Aug 22 20:36 posixpath.py
-rw-r--r--     1 root  wheel   12570 Aug 22 20:37 posixpath.pyc
-rw-r--r--     1 root  wheel   12570 Aug 22 20:37 posixpath.pyo
-rw-r--r--     1 root  wheel   11777 Aug 22 20:36 pprint.py
-rw-r--r--     1 root  wheel   11144 Aug 22 20:37 pprint.pyc
-rw-r--r--     1 root  wheel   10967 Aug 22 20:37 pprint.pyo
-rwxr-xr-x     1 root  wheel   22782 Aug 22 20:36 profile.py
-rw-r--r--     1 root  wheel   18408 Aug 22 20:37 profile.pyc
-rw-r--r--     1 root  wheel   18161 Aug 22 20:37 profile.pyo
-rw-r--r--     1 root  wheel   26711 Aug 22 20:36 pstats.py
-rw-r--r--     1 root  wheel   28013 Aug 22 20:37 pstats.pyc
-rw-r--r--     1 root  wheel   28013 Aug 22 20:37 pstats.pyo

****** Skipped ******
Ubuntu
Linux distributions come with default Python 2.7.x. Some of the newer distributions come with Python 3.x. Most of the linux software modules are built on top of this default Python version. So upgrading the default Python version on Linux will break those modules. It is recommended to install the desired version using Python virtua environment. For the use cases in this book, the default Python version should be sufficient.
anees@ubuntu-web2py:~$ which python
/usr/bin/python
anees@ubuntu-web2py:~$
anees@ubuntu-web2py:~$ python --version
Python 2.7.6

anees@ubuntu-web2py:~$ ls -l /usr/lib/python2.7
total 8228
-rw-r--r--  1 root root  17876 Jun 22  2015 _abcoll.py
-rw-r--r--  1 root root  24794 Dec 29 12:08 _abcoll.pyc
-rw-r--r--  1 root root   7145 Jun 22  2015 abc.py
-rw-r--r--  1 root root   6121 Dec 29 12:08 abc.pyc
-rw-r--r--  1 root root  34231 Jun 22  2015 aifc.py
-rw-r--r--  1 root root  30307 Dec 29 12:08 aifc.pyc
-rw-r--r--  1 root root     60 Jun 22  2015 antigravity.py
-rw-r--r--  1 root root    201 Dec 29 12:08 antigravity.pyc
-rw-r--r--  1 root root   2663 Jun 22  2015 anydbm.py
-rw-r--r--  1 root root   2794 Dec 29 12:08 anydbm.pyc
-rw-r--r--  1 root root    217 Jun 22  2015 argparse.egg-info
-rw-r--r--  1 root root  88691 Jun 22  2015 argparse.py
-rw-r--r--  1 root root  63859 Dec 29 12:08 argparse.pyc
-rw-r--r--  1 root root  11805 Jun 22  2015 ast.py
-rw-r--r--  1 root root  12906 Dec 29 12:08 ast.pyc

****** Skipped ******
Python Package Manager (pip)
When Python is installed from the source, it has come with library of standard modules. When a Python interpreter is invoked, very limited number of modules were imported by default into your program’s main namespace. Other standard modules in the library can be imported into your program when you need them. There are many vendors, developer community create Python modules and deliver them through pip. pip is a Python package installer which is used to install Python packages from a repository called PyPI (Python Package Index). If you download Python versions 2.7.9 (or 3.4) and above from www.python.org, pip installer is installed by default.
If pip is not installed on your Windows or Mac OS X, you can download the Python program get-pip.py and install it on your system.
python get-pip.py
You can verify pip installation on your Windows as described below.
C:\Users\anees>python -m pip show
 ERROR: Please provide a package name or names.
 You are using pip version 7.1.2, however version 8.0.2 is available.
 You should consider upgrading via the 'python -m pip install --upgrade pip' command.


 C:\Users\anees>python -m pip install --upgrade pip
 Collecting pip
   Downloading pip-8.0.2-py2.py3-none-any.whl (1.2MB)
     100% |################################| 1.2MB 435kB/s
 Installing collected packages: pip
   Found existing installation: pip 7.1.2
     Uninstalling pip-7.1.2:
       Successfully uninstalled pip-7.1.2
 Successfully installed pip-8.0.2
You can verify pip installation on your Mac OS X as described below.
anees:~ anees$ pip show
ERROR: Please provide a package name or names.
You are using pip version 7.1.2, however version 8.0.2 is available.
You should consider upgrading via the 'pip install --upgrade pip' command.

anees:~ anees$ sudo pip install --upgrade pip
Password:
The directory '/Users/anees/Library/Caches/pip/http' or its parent directory is not owned by the current user and the cache has been disabled. Please check the permissions and owner of that directory. If executing pip with sudo, you may want sudo's -H flag.
The directory '/Users/anees/Library/Caches/pip' or its parent directory is not owned by the current user and caching wheels has been disabled. check the permissions and owner of that directory. If executing pip with sudo, you may want sudo's -H flag.
Collecting pip
  Downloading pip-8.0.2-py2.py3-none-any.whl (1.2MB)
    100% |████████████████████████████████| 1.2MB 477kB/s
Installing collected packages: pip
  Found existing installation: pip 7.1.2
    Uninstalling pip-7.1.2:
      Successfully uninstalled pip-7.1.2
Successfully installed pip-8.0.2
anees:~ anees$
Since the default Python version on Ubuntu Linux distribution may be prior to 2.7.9, you need to install pip from Linux package manager.
anees@ubuntu-web2py:~$ python --version
Python 2.7.6

anees@ubuntu-web2py:~$ sudo apt-get install python-pip

anees@ubuntu-web2py:~$ pip -V
pip 1.5.4 from /usr/lib/python2.7/dist-packages (python 2.7)
Later in this book, there are few Python packages installed using pip as and when needed by the use cases. Some of the packages may not be delivered through pip and you can download through your system packet manager or manually download it to the library. For more information to learn about pip, visit https://pip.pypa.io/en/stable/.
Installing Python Modules
As mentioned before, there are many vendor and community developed modules available and can be installed using pip. In this book, we primarily use Arista’s pyeapi module. We will also use jsonrpc module in some of the use cases in this book. In this section, we will install those modules using pip. If you have not installed pip, refer Python Package Manager (pip).
Pyeapi
[admin@ubuntu ~]$ sudo pip install pyeapi
Downloading/unpacking pyeapi
  Downloading pyeapi-0.6.1.tar.gz (115kB): 115kB downloaded
  Running setup.py (path:/tmp/pip_build_root/pyeapi/setup.py) egg_info for package pyeapi

Downloading/unpacking netaddr (from pyeapi)
  Downloading netaddr-0.7.18-py2.py3-none-any.whl (1.5MB): 1.5MB downloaded
Installing collected packages: pyeapi, netaddr
  Running setup.py install for pyeapi

Successfully installed pyeapi netaddr
Cleaning up...
Python Core Concepts
In this section, we are going to discuss the core Python concepts by using simple network use cases. There are six Python core concepts discussed and it is strongly recommended to practice these concepts as you read. You will be surprised how much you can achieve by using these simple concepts as you read through this book.
- Data Type
- Data Structure
- Control Flow Statements
- Data Operations
- Modules
- Handling Structured Data
The approach of this book is to learn by practice. This is one of the reason we chose to teach Python using networking use cases. When you practice using the use cases you know, we don’t necessarily explain every concepts textually. We recommend you to practice these concepts multiple times. You also don’t restrict yourselves to the use cases discussed in this book. Expand the practice with your own networking use cases.
Data Type
A couple of data types important to us is strings and integers. Launch the Python interpreter from your terminal.
anees:~ anees$ python
Python 2.7.10 (default, Aug 22 2015, 20:33:39)
[GCC 4.2.1 Compatible Apple LLVM 7.0.0 (clang-700.0.59.1)] on darwin
Type "help", "copyright", "credits" or "license" for more information.
>>>
Below are the examples for three data formats string, integer and floating point.
>>> switch = "10.10.10.11"
>>> type(switch)
<type 'str'>

>>> last_octet = 11
>>> type(last_octet)
<type 'int'>

>>> temperature = 39.2
>>> type(temperature)
<type 'float'>
The line ‘switch = “10.10.10.11”’ is called as assignment statement. The “switch” is called as variable and the “10.10.10.11” is called as value. Observe the spaces between variables and values. Refer Python Style Guide for whitespace in expressions for more information.
Strings are represented within quotes. There are multiple ways to represent strings. Below are the examples of representing strings using single, double and triple quotes. If you need to type the text in multiple lines as you see in the variable switch3, you have to use triple quotes.
>>> switch1 = 'description "CORE" switch'
>>>
>>> switch2 = "interface ethernet1"
>>>
>>> switch3 = """interface ethernet1
...  ip address 10.10.20.2/24
...  no shutdown
... """
>>>
You can view the content of the variable directly typing the variable name.
>>> switch3
'interface ethernet1\n ip address 10.10.20.2/24\n no shutdown\n'
“\n” is an escape character in Python to represent new line. If you need to type the multi line text in single line as you see above, you have to use escape characters within single or double quotes.
When you print the content of this string using “print” module, the data is presented in readable format instead of displaying in the string internal format using escape characters.
>>> print switch3
interface ethernet1
 ip address 10.10.20.2/24
 no shutdown
When the data is stored in the system, it has to be encoded in a specific format. Unicode is an industry standard encoding format. We will be often converting unicode to string when we display the data to the end user.
>>> switch4 = u"router bgp 100"
>>>
>>> switch4
u'router bgp 100'
>>>
>>> str(switch4)
'router bgp 100'
>>>
>>> switch5 = str(switch4)
>>> switch5
'router bgp 100'
Data Structure
Data structure is a way of organizing the data in a system. String can be considered as a data structure as well. Data structure helps us to access the data efficiently. We are going to see three Python data structures in this section. Those are list, set and dictionary. We will use list and dictionary extensively throughout this book.
List
List is a Python data structure to store a list of values. List is represented using comma-separated values inside a square [ ] bracket.
>>> device_list = ["10.10.10.13", "10.10.10.11", "10.10.10.14", "10.10.10.12"]
>>>
>>> type(device_list)
<type 'list'>
>>>
>>> device_list
['10.10.10.13', '10.10.10.11', '10.10.10.14', '10.10.10.12']
How do you access a specific value in the list? You can access the value by using the index within the square bracket.
>>> device_list[0]
'10.10.10.13'
>>> device_list[1]
'10.10.10.11'
>>> device_list[3]
'10.10.10.12'
How can we modify the list? You can add the items using append() method and you can update the existing item using assignment statement.
>>> device_list
['10.10.10.11', '10.10.10.12', '10.10.10.13']
>>>
>>> device_list.append("10.10.10.12")
>>> device_list
['10.10.10.11', '10.10.10.12', '10.10.10.13', '10.10.10.12']
>>>
>>> new_ip = "10.10.10.15"
>>> device_list.append(new_ip)
>>> device_list
['10.10.10.11', '10.10.10.12', '10.10.10.13', '10.10.10.12', '10.10.10.15']
>>>
>>> device_list[0] = new_ip
>>> device_list
['10.10.10.15', '10.10.10.12', '10.10.10.13', '10.10.10.12', '10.10.10.15']
As you can see, list can have duplicate values. Where can I find the list of operations (methods) that can be performed on the list?
>>> dir(device_list)
['__add__', '__class__', '__contains__', '__delattr__', '__delitem__', '__delslice__', '__doc__', '__eq__', '__format__', '__ge__', '__getattribute__', '__getitem__', '__getslice__', '__gt__', '__hash__', '__iadd__', '__imul__', '__init__', '__iter__', '__le__', '__len__', '__lt__', '__mul__', '__ne__', '__new__', '__reduce__', '__reduce_ex__', '__repr__', '__reversed__', '__rmul__', '__setattr__', '__setitem__', '__setslice__', '__sizeof__', '__str__', '__subclasshook__',
'append', 'count', 'extend', 'index', 'insert', 'pop', 'remove', 'reverse', 'sort']

>>> help(device_list)
|
|  append(...)
|      L.append(object) -- append object to end
|
|  count(...)
|      L.count(value) -> integer -- return number of occurrences of value
|
|  extend(...)
|      L.extend(iterable) -- extend list by appending elements from the iterable
|
|  index(...)
|      L.index(value, [start, [stop]]) -> integer -- return first index of value.
|      Raises ValueError if the value is not present.
|
|  insert(...)
|      L.insert(index, object) -- insert object before index
|
|  pop(...)
|      L.pop([index]) -> item -- remove and return item at index (default last).
|      Raises IndexError if list is empty or index is out of range.
|
|  remove(...)
|      L.remove(value) -- remove first occurrence of value.
|      Raises ValueError if the value is not present.
|
|  reverse(...)
|      L.reverse() -- reverse *IN PLACE*
|
|  sort(...)
|      L.sort(cmp=None, key=None, reverse=False) -- stable sort *IN PLACE*;
|      cmp(x, y) -> -1, 0, 1
:
<Type q to exit>
Let us explore few more methods over the list.
>>> device_list = ['10.10.10.11', '10.10.10.12', '10.10.10.13', '10.10.10.14', '10.10.10.15']

>>> device_list.reverse()
>>> device_list
['10.10.10.15', '10.10.10.14', '10.10.10.13', '10.10.10.12', '10.10.10.11']

>>> device_list.sort()
>>> device_list
['10.10.10.11', '10.10.10.12', '10.10.10.13', '10.10.10.14', '10.10.10.15']

>>> device_list.pop()
'10.10.10.15'
>>> device_list
['10.10.10.11', '10.10.10.12', '10.10.10.13', '10.10.10.14']

>>> device_list.remove("10.10.10.12")
>>> device_list
['10.10.10.11', '10.10.10.13', '10.10.10.14']
Set
- Set is similar to list with few differences:
- Items in set are unique. It eliminates duplicate entries.
- Unordered list of items.
- Supports powerful operations such as difference, union and intersection between sets.
Let us create a set and practice some of the basic operations related to set.
>>> device_set = set(["10.10.10.11", "10.10.10.12"])
>>>
>>> device_set
set(['10.10.10.11', '10.10.10.12'])

>>> type(device_set)
<type 'set'>

>>> device_set.add("10.10.10.13")
>>> device_set
set(['10.10.10.11', '10.10.10.13', '10.10.10.12'])

>>> device_set.remove("10.10.10.12")
>>> device_set
set(['10.10.10.11', '10.10.10.13'])

>>> new_ip = "10.10.10.13"
>>> device_set.add(new_ip)
>>> device_set
set(['10.10.10.11', '10.10.10.13'])
You can convert a list to set. If the list has duplicate entries, converting to set will eliminate the duplicate entries.
>>> device_list
['10.10.10.15', '10.10.10.12', '10.10.10.13', '10.10.10.12', '10.10.10.15']

>>> device_list_to_set = set(device_list)
>>> device_list_to_set
set(['10.10.10.15', '10.10.10.13', '10.10.10.12'])
Let us explore the methods specific to set.
>>> dir(device_set)
['__and__', '__class__', '__cmp__', '__contains__', '__delattr__', '__doc__', '__eq__', '__format__', '__ge__', '__getattribute__', '__gt__', '__hash__', '__iand__', '__init__', '__ior__', '__isub__', '__iter__', '__ixor__', '__le__', '__len__', '__lt__', '__ne__', '__new__', '__or__', '__rand__', '__reduce__', '__reduce_ex__', '__repr__', '__ror__', '__rsub__', '__rxor__', '__setattr__', '__sizeof__', '__str__', '__sub__', '__subclasshook__', '__xor__',
'add', 'clear', 'copy', 'difference', 'difference_update', 'discard', 'intersection', 'intersection_update', 'isdisjoint', 'issubset', 'issuperset', 'pop', 'remove', 'symmetric_difference', 'symmetric_difference_update', 'union', 'update']

>>> switch1_neighbors = set(["switch2", "switch3", "switch4"])
>>> switch2_neighbors = set(["switch1", "switch3", "switch5"])

>>> switch1_neighbors.intersection(switch2_neighbors)
set(['switch3'])

>>> switch1_neighbors.union(switch2_neighbors)
set(['switch3', 'switch2', 'switch1', 'switch5', 'switch4'])

>>> switch2_neighbors.difference(switch1_neighbors)
set(['switch1', 'switch5'])
Dictionary
Dictionary is a list of {key: value} items and defined using curly brackets. Let us look at the basic operations using dictionary.
>>> inventory = {"10.10.10.11": "spine-1", "10.10.10.12": "spine-2"}
>>> type(inventory)
<type 'dict'>

>>> inventory["10.10.10.11"]
'spine-1'

>>> inventory["10.10.10.13"] = "tor-1"
>>> inventory
{'10.10.10.11': 'spine-1', '10.10.10.13': 'tor-1', '10.10.10.12': 'spine-2'}

>>> inventory.keys()
['10.10.10.11', '10.10.10.13', '10.10.10.12']
The values of the dictionary can be a simple string, a list or another dictionary. Below is an example that shows a value of a key which is another dictionary.
>>> inventory["10.10.10.11"] = {"hostname": "spine-1", "version": "4.15.4F", "model": "7050SX-128"}
>>> inventory
{'10.10.10.11': {'model': '7050SX-128', 'hostname': 'spine-1', 'version': '4.15.4F'}, '10.10.10.13': 'tor-1-a', '10.10.10.12': 'spine-2'}

>>> inventory["10.10.10.11"]
{'model': '7050SX-128', 'hostname': 'spine-1', 'version': '4.15.4F'}

>>> inventory["10.10.10.11"]["version"]
'4.15.4F'
Control Flow Statements
The flow of the script can be changed by conditional and loop statements. We are going to take a look at “if clause” and “for loop” in this section.
if
Here is an example of using simple if clause. We are also using the operators == (Equal to) and != (Not Equal to).
>>> interface = "management1"
>>>
>>> if interface == "management1":
...     print "It is the management interface"
...
It is the management interface

>>> if interface != "management1":
...     print "It is NOT the management interface"
>>>
The statements following if statement are indented by 4 spaces. Refer Python Style Guide for Indentation for more information. Here is an example of using if and else clause. We are using the operator <= (Less than equal to).
>>> max_interfaces = 36

>>> n = 10

>>> if n <= max_interfaces:
...     print "Interface number is within the range"
... else:
...     print "Interface number is not within the range"
...
Interface number is within the range
Here is an example of using if, elif and else clause. We are using the operator “not in” against the list.
>>> device_list = ["10.10.10.11", "10.10.10.12", "10.10.10.13"]

>>> if "10.10.10.11" not in device_list:
...     print "10.10.10.11 is not in  the list"
... elif "10.10.10.12" not in device_list:
...     print "10.10.10.12 is not in the list"
... elif "10.10.10.13" not in device_list:
...     print "10.10.10.13 not in device_list"
... else:
...     print "all the IPs are in the device_list"
...
all the IPs are in the device_list
Here is an example to find whether a list is empty or not using if clause.
>>> device_list = []
>>> if not device_list:
...     print "Empty List"
...
Empty List

>>> device_list = ["10.10.10.11"]
>>> if not device_list:
...     print "Empty List"
... else:
...     print "Not Empty"
...
Not Empty
Here is an example to find whether a dictionary is empty or not using if clause.
>>> inventory = {"10.10.10.11": "host1"}

>>> not inventory
False
>>>
>>> bool(inventory)
True

>>> if bool(inventory):
...     print inventory
...
{'10.10.10.11': 'host1'}

>>> if not inventory:
...     print "Empty dictionary"
... else:
...     print inventory
...
{'10.10.10.11': 'host1'}

*** With Empty Dictionary ***

>>> inventory = {}

>>> not inventory
True
>>> bool(inventory)
False

>>> if not inventory:
...     print "Empty dictionary"
...
Empty dictionary

>>> if bool(inventory):
...     print "NOT EMPTY"
... else:
...     print "Empty Dictionary"
...
Empty Dictionary
for
for loop is used to iterate over a sequence of items. Below is an example of iterating list and dictionary.
>>> device_list = ["10.10.10.11", "10.10.10.12", "10.10.10.13"]
>>>
>>> for each_ip in device_list:
...     print each_ip
...
10.10.10.11
10.10.10.12
10.10.10.13

>>> inventory = {'10.10.10.11': {'model': '7050SX-128', 'hostname': 'spine-1', 'version': '4.15.4F'},  '10.10.10.12': {'model': '7050SX-128', 'hostname': 'spine-2', 'version': '4.15.4F'}, '10.10.10.13': {'model': '7050SX-128', 'hostname': 'leaf-1', 'version': '4.15.6M'}}

>>> for each_ip in inventory:
...     print each_ip
...
10.10.10.11
10.10.10.13
10.10.10.12

>>> for each_ip in inventory:
...     print inventory[each_ip]["hostname"]
...
spine-1
leaf-1
spine-2
Data Operations
In this section we are going to discuss about the various in built methods for strings and integers.
String
By now you know how to find the supported methods (dir()) for various types of data structures and data types. Let us practice some basic methods on strings.
>>> ip_address = "ip address 10.10.10.11/24"
>>> ip_address.split()
['ip', 'address', '10.10.10.11/24']

>>> ip_address.split()[2]
'10.10.10.11/24'

>>> ip_address.split()[2].split("/")
['10.10.10.11', '24']

>>> ip_address.split()[2].split("/")[0]
'10.10.10.11'
split() splits the string into list. The default delimiter is empty space.
Now let us practice how we can combine strings.
>>> ip = "10.10.10.100"
>>> subnet_mask = 24

>>> ip_addr = "ip address" + ip
>>> ip_addr
'ip address10.10.10.100'

>>> ip_addr = "ip address " + ip
>>> ip_addr
'ip address 10.10.10.100'

>>> ip_statement = ip_addr + "/" + subnet_mask
Traceback (most recent call last):
  File "<stdin>", line 1, in <module>
TypeError: cannot concatenate 'str' and 'int' objects

>>> type(subnet_mask)
<type 'int'>

>>> ip_statement = ip_addr + "/" + str(subnet_mask)
>>> ip_statement
'ip address 10.10.10.100/24'
As you see when we try to add a string and integer, Python reports TypeError: cannot concatenate ‘str’ and ‘int’ objects. So we converted the integer to string using str(subnet_mask) method and concatenated to ip_addr string variable.
Integer
Here are the some of the examples of methods over integers and floating point.
>>> number_of_line_cards = 8
>>> ports_per_line_card = 36

>>> total_number_of_ports = number_of_line_cards * ports_per_line_card
>>> total_number_of_ports
288

>>> used_ports = 120
>>> free_ports = total_number_of_ports - used_ports
>>> free_ports
168

>>> ports_usage_in_percentage = (used_ports/total_number_of_ports) * 100
>>> ports_usage_in_percentage
0

>>> 120/288
0
>>> float(120/288)
0.0
>>> 120.0/288.0
0.4166666666666667

>>> ports_usage_in_percentage = (float(used_ports)/float(total_number_of_ports) * 100)
>>> ports_usage_in_percentage
41.66666666666667
“free_ports = total_number_of_ports - used_ports” is called as statement. In that, “total_number_of_ports - used_ports” is called as expression. Within the expression, total_number_of_ports, used_ports are variables and “-” is called as operator.
Simple Use Cases
We will practice few simple use cases based on the concepts we have learned so far. Here is an example of using for loop and string methods. In this example, we will extract the IP addresses from the “show ip interface brief” output.
>>> ip_int_br = """ Interface              IP Address         Status     Protocol         MTU
... Ethernet1/1.101        192.168.121.0/31   up         up              1500
... Ethernet2/1.101        192.168.221.0/31   down       lowerlayerdown  1500
... Ethernet3/1.301        10.12.1.0/31       up         up              1500
... Ethernet3/1.317        10.12.1.32/31      up         up              1500
... Ethernet3/1.333        10.12.1.64/31      up         up              1500
... Ethernet3/1.349        10.12.1.96/31      up         up              1500 """

>>> ip_int_br
' Interface              IP Address         Status     Protocol         MTU\nEthernet1/1.101        192.168.121.0/31   up         up              1500\nEthernet2/1.101        192.168.221.0/31   down       lowerlayerdown  1500\nEthernet3/1.301        10.12.1.0/31       up         up              1500\nEthernet3/1.317        10.12.1.32/31      up         up              1500\nEthernet3/1.333        10.12.1.64/31      up         up              1500\nEthernet3/1.349        10.12.1.96/31      up         up              1500'

>>> ip_int_br.split("\n")
[' Interface              IP Address         Status     Protocol         MTU', 'Ethernet1/1.101        192.168.121.0/31   up         up              1500', 'Ethernet2/1.101        192.168.221.0/31   down       lowerlayerdown  1500', 'Ethernet3/1.301        10.12.1.0/31       up         up              1500', 'Ethernet3/1.317        10.12.1.32/31      up         up              1500', 'Ethernet3/1.333        10.12.1.64/31      up         up              1500', 'Ethernet3/1.349        10.12.1.96/31      up         up              1500']

>>> for each_line in ip_int_br.split("\n"):
...     print each_line
...
 Interface              IP Address         Status     Protocol         MTU
Ethernet1/1.101        192.168.121.0/31   up         up              1500
Ethernet2/1.101        192.168.221.0/31   down       lowerlayerdown  1500
Ethernet3/1.301        10.12.1.0/31       up         up              1500
Ethernet3/1.317        10.12.1.32/31      up         up              1500
Ethernet3/1.333        10.12.1.64/31      up         up              1500
Ethernet3/1.349        10.12.1.96/31      up         up              1500

>>> for each_line in ip_int_br.split("\n"):
...     print each_line.split()[1]
...
IP
192.168.121.0/31
192.168.221.0/31
10.12.1.0/31
10.12.1.32/31
10.12.1.64/31
10.12.1.96/31
Here is another example of using for loop, string and integer methods. We will calculate the number of subnets and IP addresses (including network and broadcast IP addresses) from the given network address and subnet mask.
>>> network_block = "192.168.1.0/24"
>>> subnet_mask = 30

*** Identify the number of bits used for network. "subnet_mask - network_mask" *****
>>> network_block.split("/")
['192.168.1.0', '24']
>>> network_block.split("/")[1]
'24'
>>> subnet_mask - int(network_block.split("/")[1])
6

*** Number of subnets = 2 to the power of (subnet_mask - network_mask) ***
>>> number_of_subnets = 2 ** (subnet_mask - int(network_block.split("/")[1]))
>>> number_of_subnets
64

*** Number of IPs per subnet = 2 to the power of number of host bits ***
>>> number_of_ips_per_subnet = 2 ** (32 - subnet_mask)
>>> number_of_ips_per_subnet
4
If you look at some of the statements, we have more than one operators in the expression. When you have more than one operators in an expression, Python follows the conventional method called as PEMDAS (Parenthesis, Exponents, Multiplication, Division, Addition, Subtraction) to calculate the result.
Now, we will continue to update our script to calculate the subnet addresses for the given network block and subnet mask.
>>> subnet_octets = network_block.split("/")[0].split(".")
>>> subnet_octets
['192', '168', '1', '0']

>>> ".".join(subnet_octets)
'192.168.1.0'

>>> subnetwork_address = int(subnet_octets[3])
>>> for each_subnet in range(0, number_of_subnets):
...     subnet_octets[3] = str(subnetwork_address)
...     subnets = ".".join(subnet_octets) + "/" + str(subnet_mask)
...     print subnets
...     subnetwork_address += number_of_ips_per_subnet
...
192.168.1.0/30
192.168.1.4/30
192.168.1.8/30
192.168.1.12/30
192.168.1.16/30
!!!! Output Omitted for brevity
192.168.1.228/30
192.168.1.232/30
192.168.1.236/30
192.168.1.240/30
192.168.1.244/30
192.168.1.248/30
192.168.1.252/30
Within the for loop, we are just updating the fourth octet of the IP addresses and appending the string to list the subnet addresses.
Script File
So far, We have been practicing the core concepts using Python interpreter. This approach of using interpreter is called as interactive mode. As you see in the previous use case, it is getting complicated to use the interpreter as the script gets complicated. It is time to start writing scripts in a file which will be saved as .py file in your system. Then the script file is executed directly from your terminal or from any development environment. Now, the question comes what editor should we use to create the .py file. One could use a simple text editor to write the scripts. Working with the text editor is something similar to writing script in the Python interpreter where you have to make sure you write the code with correct indentation and correct syntax.
There are sophisticated advanced editors that can provide auto indentation and in some cases auto completing the statements. You can start writing the script using one of the advanced editors such as Atom or Sublime.
Later in this book, we use Python’s Integrated Development Environment (IDLE) to create scripts. IDLE is installed as part of the Python software package when you download and install from www.python.org. There are several vendor developed integrated development environments (IDE) such as Wing IDE, PyCharm, Komodo, etc are available in the market. In addition to the benefits provided by advanced editors, IDEs are great while developing, testing and debugging complex software applications.
Create a folder in the home directory of your system and save the scripts you are writing in that folder. Open your choice of editor and create a new script and save the file as subnet_calculator.py.
We are going to take the script we built so far using interactive mode and paste it in this new script file. The script we have written so far is very specific to class C subnets. We are going to add a logic that automatically derive the class from the given network block and subnet mask.
network_block = "10.32.10.0/24"
subnet_mask = 26

# split the network block into IP address and Network Mask
ip_address = network_block.split("/")[0]
network_mask = int(network_block.split("/")[1])
octets = ip_address.split(".")

# Find the octet number for which subnet address needs to be calculated
# class A = 1, Class B = 2, Class C = 3
subnet_octet = network_mask / 8

# Find out how many subnets for a given network mask and subnet mask
number_of_subnets = 2 ** (subnet_mask - network_mask)

# Total number of IPs within a subnet
# host class for class A, B and C is 16, 24 and 32 respectively.
host_class = (subnet_octet * 8) + 8
number_of_ips_per_subnet = 2 ** (host_class - subnet_mask)

# Derive the subnet addresses
subnetwork_address = int(octets[subnet_octet])

for each_subnet in range(0, number_of_subnets):
  octets[subnet_octet] = str(subnetwork_address)
  subnets = ".".join(octets) + "/" + str(subnet_mask)
  print subnets
  subnetwork_address += number_of_ips_per_subnet
It may take sometime to understand the logic of the script. Later in this book, we will learn to write an algorithm and we develop all the scripts step by step by following the algorithm. For now, just save and run the script from your system.
anees:my-scripts anees$ ls subnet*
subnet_calculator.py

anees:my-scripts anees$ python subnet_calculator.py
10.32.10.0/26
10.32.10.64/26
10.32.10.128/26
10.32.10.192/26
Modules
As you start learning to write scripts, you will end up in reusing some of your programs. You can write the reusable scripts as functions in Python. You can also write all of your reusable use cases as multiple functions and save it in a .py file. Then for any new programs or scripts, you can import these functions in the .py file and use it. This .py file is called as module in Python.
In some cases, you may end up in building multiple modules and you may need all these modules to build more sophisticated software applications. Collection of these modules can be called as packages in Python.
There are several standard modules or packages installed as part of the Python installation. You can find those packages in the lib folder of Python installation in your system. For example in Windows, c:python2.7lib and in Linux & MAC OS X, /usr/lib/python2.7/ have the standard Python modules.
We will explore some of the standard modules (pprint, sys and re) in this section. Launch the Python interpreter from your terminal.
pprint
Pretty printer (pprint) is a very useful module especially when we handle dictionaries. In order to use the modules, you must import them into your script.
>>> import pprint
>>>
>>> dir()
['__builtins__', '__doc__', '__name__', '__package__', 'pprint']
>>> dir(pprint)
['PrettyPrinter', '_StringIO', '__all__', '__builtins__', '__doc__', '__file__', '__name__', '__package__', '_commajoin', '_id', '_len', '_perfcheck', '_recursion', '_safe_repr', '_sorted', '_sys', '_type',
'isreadable', 'isrecursive', 'pformat', 'pprint', 'saferepr', 'warnings']

>>> inventory = {'10.10.10.11': {'model': '7050SX-128', 'hostname': 'spine-1', 'version': '4.15.4F'}, '10.10.10.13': 'tor-1-a', '10.10.10.12': 'spine-2'}

>>> print inventory
{'10.10.10.11': {'model': '7050SX-128', 'hostname': 'spine-1', 'version': '4.15.4F'}, '10.10.10.13': 'tor-1-a', '10.10.10.12': 'spine-2'}

>>> pprint.pprint(inventory)
{'10.10.10.11': {'hostname': 'spine-1',
                 'model': '7050SX-128',
                 'version': '4.15.4F'},
 '10.10.10.12': 'spine-2',
 '10.10.10.13': 'tor-1-a'}
Both print and pprint are inbuilt modules in Python. But print is loaded in your program namespace when you launch the Python program by default. You can see the difference between the outputs of the dictionary using print and pprint.
sys
sys module provide system specific functions which can be used to interact with the systems (Microsoft Windows, Apple Mac, Linux, etc) objects and variables. In the subnet_calculator.py, we specify the network address and the subnet mask within the script. We are going to use sys module to input both of these values as arguments instead of hard coding into the script.
import sys

network_block = sys.argv[1]
subnet_mask = int(sys.argv[2])

# split the network block into IP address and Network Mask
ip_address = network_block.split("/")[0]
network_mask = int(network_block.split("/")[1])
octets = ip_address.split(".")

# Find the octet number for which subnet address needs to be calculated
subnet_octet = network_mask / 8

# Find out how many subnets for a given network mask and subnet mask
number_of_subnets = 2 ** (subnet_mask - network_mask)

# Total number of IPs within a subnet
host_class = (subnet_octet * 8) + 8
number_of_ips_per_subnet = 2 ** (host_class - subnet_mask)

# Derive the subnet addresses
subnetwork_address = int(octets[subnet_octet])

for each_subnet in range(0, number_of_subnets):
  octets[subnet_octet] = str(subnetwork_address)
  subnets = ".".join(octets) + "/" + str(subnet_mask)
  print subnets
  subnetwork_address += number_of_ips_per_subnet
Save and run the script from your system.
anees:my-scripts anees$ ls subnet*
subnet_calculator.py

anees:my-scripts anees$ python subnet_calculator.py 10.10.10.0/24 26
10.10.10.0/26
10.10.10.64/26
10.10.10.128/26
10.10.10.192/26
What will happen if the user does not provide the arguments?
anees:my-scripts anees$ python subnet_calculator.py
Traceback (most recent call last):
  File "subnet_calculator.py", line 3, in <module>
    network_block = sys.argv[1]
IndexError: list index out of range
We can add a validation check in the script to make sure the user provides two arguments. If the user does not provide the arguments, the script should display a message that educates the user.
import sys

if len( sys.argv ) <= 2:
    sys.stderr.write("Example Syntax \n")
    sys.stderr.write("python subnet_calculator.py 192.168.1.0/24 28 \n")
    sys.exit( 1 )

network_block = sys.argv[1]
subnet_mask = int(sys.argv[2])

# split the network block into IP address and Network Mask
ip_address = network_block.split("/")[0]
network_mask = int(network_block.split("/")[1])
octets = ip_address.split(".")

# Find which octet for which subnet address needs to be calculated
# class A = 1, Class B = 2, Class C = 3
subnet_octet = network_mask / 8

# Find out how many subnets for a given network mask and subnet mask
number_of_subnets = 2 ** (subnet_mask - network_mask)

# Total number of IPs within a subnet
# host class for class A, B and C is 16, 24 and 32.
host_class = (subnet_octet * 8) + 8
number_of_ips_per_subnet = 2 ** (host_class - subnet_mask)

# Derive the subnet addresses
subnetwork_address = int(octets[subnet_octet])

for each_subnet in range(0, number_of_subnets):
    octets[subnet_octet] = str(subnetwork_address)
    subnets = ".".join(octets) + "/" + str(subnet_mask)
    print subnets
    subnetwork_address += number_of_ips_per_subnet
Save and run the script from your system.
anees:my-scripts anees$ python subnet_calculator.py
Example Syntax
python subnet_calculator.py 192.168.1.0/24 28
re - Regular Expression
Regular expression is a powerful method when it comes to automation. We are going to practice a couple of use cases in this section using regular expression.
Best Practices Assessment
In this first use case, we are going to use re.search() method. We are going to practice a script to validate if the bgp best practices commands such as “update wait-for-convergence” and “update wait-install” are configured.
>>> import re
>>>
>>> config = """
... interface Loopback0
...    description loopback interface for BGP peering
...    ip address 192.168.100.2/32
... !
... router bgp 100
...    update wait-for-convergence
...    maximum-paths 4
...    neighbor 10.1.1.1 remote-as 1001
...    neighbor 10.1.1.1 maximum-routes 12000
...    neighbor 192.168.128.18 remote-as 201
...    neighbor 192.168.128.18 maximum-routes 12000
...    neighbor 192.168.128.22 remote-as 201
...    neighbor 192.168.128.22 maximum-routes 12000
...    network 10.10.10.0/24
...    network 192.168.100.2/32
... """
>>>
>>> validate = re.search("update wait-for-convergence", config)
>>> validate
<_sre.SRE_Match object at 0x100f5d9f0>

>>> if validate:
...     print "Match Found"
... else:
...     print "Match NOT Found"
...
Match Found
>>>
>>> validate = re.search("update wait-install", config)
>>> validate
>>>
>>> if validate:
...     print "Match Found"
... else:
...     print "Match NOT Found"
...
Match NOT Found
If a match is found, re.search() will return a Match Object instance. If a match is not found, it returns None.
Configuration Generator - Collecting the variables from the configuration template
In this second use case, we are going to use re.findall() method. Network engineers can standardize network device configurations. Once they standardize network device configurations, they can create configuration template which can be used to generate configurations for any number of devices by filling up the variables such as hostname, IP addresses, etc. In this example, we will show how we can collect the variables from the configuration template. Later in this chapter, we will complete the script by replacing the variables with the actual values.
Import re

>>> config = """
... hostname $hostname
... !
... interface management1
...  ip address $ip_mgmt/24
... !
... interface loopback0
...  ip address $ip_lo0/32
... !
... """

>>> re.findall("\$\w+", config)
['$hostname', '$ip_mgmt', '$ip_lo0']
Handling Structured Data
In this section, we are going to complete the configuration generator script which we started in the regular expression section. We are going to save the configuration template in a text file and the variables will be stored in a json or yaml file.
Text
Create a configuration template and store it in a text file.
anees:files anees$ pwd
/Users/anees/Dropbox/my-scripts/files

anees:files anees$ vi config_template.txt
hostname $hostname
!
interface management1
 ip address $ip_mgmt/24
!
interface loopback0
 ip address $ip_lo0/32
!
interface ethernet49/1
 speed forced 40gfull
 ip address $ip_to_spine1/31
!
interface ethernet50/1
 speed forced 40gfull
 ip address $ip_to_spine2/31
!
router bgp $bgp_as
 router-id $ip_lo0
 neighbor $ip_spine1 remote-as 65000
 neighbor $ip_spine2 remote-as 65000
 network $ip_lo0/32
We will write a Python script to read this file. Create a Python script file and call it as config_generator.py. with open(“file_name”) is used to open the file. It automatically closes the file after the indented code block is executed.
file_path = "/Users/anees/Dropbox/my-scripts/files/"
file_name = "config_template.txt"

config_file = file_path + file_name

with open(config_file) as read_file:
    config_template = read_file.read()

print config_template
Save and run the script.
anees:my-scripts anees$ python config_generator.py
hostname $hostname
!
interface management1
 ip address $ip_mgmt/24
!
interface loopback0
 ip address $ip_lo0/32
!
interface ethernet49/1
 speed forced 40gfull
 ip address $ip_to_spine1/31
!
interface ethernet50/1
 speed forced 40gfull
 ip address $ip_to_spine2/31
!
router bgp $bgp_as
 router-id $ip_lo0
 neighbor $ip_spine1 remote-as 65000
 neighbor $ip_spine2 remote-as 65000
 network $ip_lo0/32
!
Now, we are going to identify all the variables in the configuration template. We can use the regular expression module to identify all the variables starting with $. re.findall(“$w+”, config_template) creates a list of the words starting with $. Since the configuration template may use the same variable name in multiple places, there will be duplicate entries in the list created by re.findall. We will convert the list to set to eliminate the duplicate entries.
import re

file_path = "/Users/anees/Dropbox/my-scripts/files/"
file_name = "config_template.txt"

config_file = file_path + file_name

with open(config_file) as read_file:
    config_template = read_file.read()

variables = set(re.findall("\$\w+", config_template))

print variables
Save and run the script.
anees:my-scripts anees$ python config_generator.py
set(['$ip_mgmt', '$ip_lo0', '$hostname', '$ip_spine2', '$ip_spine1', '$ip_to_spine2', '$ip_to_spine1', '$bgp_as'])
JSON
JSON provides a data structure which is easy to read by human as well as easy to parse the data using programming languages. The structure is very similar to what we learned in Python dictionary ({key: value}) earlier in this chapter. We will create a file using JSON format with the variables we have used in the configuration template as keys.
anees:my-scripts anees$ vi variables.json
{
  "$ip_mgmt": "192.168.1.11",
  "$ip_lo0": "10.10.10.10",
  "$hostname": "sjcpod1tor1",
  "$ip_spine2": "10.10.101.2",
  "$ip_spine1": "10.10.102.2",
  "$ip_to_spine2": "10.10.101.1",
  "$ip_to_spine1": "10.10.102.1",
  "$bgp_as": "65101"
}
We will update our config_generator.py to read this json file and replace the variables in the configuration template with the values in the variables.json file. In order to read the json file, we will use the Python json module.
import re
import json

file_path = "/Users/anees/Dropbox/my-scripts/files/"
file_name = "config_template.txt"
variables_file_name = "variables.json"

config_file = file_path + file_name
variables_file = file_path + variables_file_name

# Read Config template file
with open(config_file) as read_file:
    config_template = read_file.read()

# Read the variables from the config template
variables = set(re.findall("\$\w+", config_template))

# Read the variables from the json file
with open(variables_file) as read_file:
    variables_dictionary = json.load(read_file)

print variables_dictionary
Save and run the script.
anees:my-scripts anees$ python config_generator.py
{u'$ip_mgmt': u'192.168.1.11', u'$ip_lo0': u'10.10.10.10', u'$hostname': u'sjcpod1tor1', u'$ip_spine2': u'10.10.101.2', u'$ip_spine1': u'10.10.102.2', u'$ip_to_spine2': u'10.10.101.1', u'$ip_to_spine1': u'10.10.102.1', u'$bgp_as': u'65101'}
As you can see, json.load(read_file) imports the content of the json file as dictionary. Now we will update our script which generates the configuration from the configuration template and the variables dictionary.
import re
import json

file_path = "/Users/anees/Dropbox/my-scripts/files/"
file_name = "config_template.txt"
variables_file_name = "variables.json"

config_file = file_path + file_name
variables_file = file_path + variables_file_name

# Read Config template file
with open(config_file) as read_file:
    config_template = read_file.read()

# Read the variables from the config template
variables = set(re.findall("\$\w+", config_template))

# Read the variables from the json file
with open(variables_file) as read_file:
    variables_dictionary = json.load(read_file)

# Generate Configuration from Config template and variables
config = config_template

for each_variable in variables:
    config = config.replace(each_variable, variables_dictionary[each_variable])

print config
Save and run the script.
anees:my-scripts anees$ python config_generator.py
hostname sjcpod1tor1
!
interface management1
 ip address 192.168.1.11/24
!
interface loopback0
 ip address 10.10.10.10/32
!
interface ethernet49/1
 speed forced 40gfull
 ip address 10.10.102.1/31
!
interface ethernet50/1
 speed forced 40gfull
 ip address 10.10.101.1/31
!
router bgp 65101
 router-id 10.10.10.10
 neighbor 10.10.102.2 remote-as 65000
 neighbor 10.10.101.2 remote-as 65000
 network 10.10.10.10/32
!
YAML
YAML is a data serialization language which provides a human readable data structure that can be easily accessible by programming languages. YAML is a superset of JSON.
In the previous section, we created the variables file in JSON format. In this section, we will create the variables in YAML format. We are going to create the variables for multiple devices.
anees:my-scripts anees$ vi variables.yaml
---
  JPE14080457:
    $ip_mgmt: 192.168.1.11
    $ip_lo0: 10.10.10.11
    $hostname: sjcpod1tor1
    $ip_spine2: 10.10.101.1
    $ip_spine1: 10.10.102.1
    $ip_to_spine2: 10.10.101.0
    $ip_to_spine1: 10.10.102.0
    $bgp_as: 65101

  JPE14421537:
    $ip_mgmt: 192.168.1.12
    $ip_lo0: 10.10.10.12
    $hostname: sjcpod1tor2
    $ip_spine2: 10.10.101.3
    $ip_spine1: 10.10.102.3
    $ip_to_spine2: 10.10.101.2
    $ip_to_spine1: 10.10.102.2
    $bgp_as: 65102
We will update our config_generator.py script to read the yaml file and display the content. We will use pprint module to print the output.
import re
import yaml
import pprint

file_path = "/Users/anees/Dropbox/my-scripts/files/"
file_name = "config_template.txt"
variables_file_name = "variables.yaml"

config_file = file_path + file_name
variables_file = file_path + variables_file_name

# Read Config template file
with open(config_file) as read_file:
    config_template = read_file.read()

# Read the variables from the config template
variables = set(re.findall("\$\w+", config_template))

# Read the variables from the json file
with open(variables_file) as read_file:
    variables_dictionary = yaml.load(read_file)

pprint.pprint(variables_dictionary)
Save and run the script.
anees:my-scripts anees$ python config_generator.py
{'JPE14080457': {'$bgp_as': 65101,
                 '$hostname': 'sjcpod1tor1',
                 '$ip_lo0': '10.10.10.11',
                 '$ip_mgmt': '192.168.1.11',
                 '$ip_spine1': '10.10.102.1',
                 '$ip_spine2': '10.10.101.1',
                 '$ip_to_spine1': '10.10.102.0',
                 '$ip_to_spine2': '10.10.101.0'},
 'JPE14421537': {'$bgp_as': 65102,
                 '$hostname': 'sjcpod1tor2',
                 '$ip_lo0': '10.10.10.12',
                 '$ip_mgmt': '192.168.1.12',
                 '$ip_spine1': '10.10.102.3',
                 '$ip_spine2': '10.10.101.3',
                 '$ip_to_spine1': '10.10.102.2',
                 '$ip_to_spine2': '10.10.101.2'}}
Now we will update our script which generates the configuration from the configuration template and the variables dictionary.
import re
import yaml

file_path = "/Users/anees/Dropbox/my-scripts/files/"
file_name = "config_template.txt"
variables_file_name = "variables.yaml"

config_file = file_path + file_name
variables_file = file_path + variables_file_name

# Read Config template file
with open(config_file) as read_file:
    config_template = read_file.read()

# Read the variables from the config template
variables = set(re.findall("\$\w+", config_template))

# Read the variables from the json file
with open(variables_file) as read_file:
    variables_dictionary = yaml.load(read_file)

# Generate Configuration from Config template and variables
for each_switch in variables_dictionary:
    config = config_template
    for each_variable in variables:
        config = config.replace(each_variable, str(variables_dictionary[each_switch][each_variable]))

    print "#" * 50
    print config
Save and run the script.
anees:my-scripts anees$ python config_generator.py
##################################################
hostname sjcpod1tor2
!
interface management1
 ip address 192.168.1.12/24
!
interface loopback0
 ip address 10.10.10.12/32
!
interface ethernet49/1
 speed forced 40gfull
 ip address 10.10.102.2/31
!
interface ethernet50/1
 speed forced 40gfull
 ip address 10.10.101.2/31
!
router bgp 65102
 router-id 10.10.10.12
 neighbor 10.10.102.3 remote-as 65000
 neighbor 10.10.101.3 remote-as 65000
 network 10.10.10.12/32
!
##################################################
hostname sjcpod1tor1
!
interface management1
 ip address 192.168.1.11/24
!
interface loopback0
 ip address 10.10.10.11/32
!
interface ethernet49/1
 speed forced 40gfull
 ip address 10.10.102.0/31
!
interface ethernet50/1
 speed forced 40gfull
 ip address 10.10.101.0/31
!
router bgp 65101
 router-id 10.10.10.11
 neighbor 10.10.102.1 remote-as 65000
 neighbor 10.10.101.1 remote-as 65000
 network 10.10.10.11/32
!
anees:my-scripts anees$
Summary
Since we learned the core Python concepts, we will move forward to build scripts for Arista networking use cases. In the next chapter, we will build a framework which you can use to build Python scripts for networking use cases. We are going to use Arista’s Pyeapi module to interact with Arista switches. We have also used jsonrpc for some of the use cases. Before proceeding to next chapter, install pyeapi module using pip on your system.